Showing posts with label Windows. Show all posts

How To Jailbreak iOS 6.1.3, 6.1.4 And 6.1.5 Using P0sixpwn [Windows] [Mac]


Whatever your reason for sticking to the iOS 6.1.x firmware on your iPhone, iPod Touch or iPad you will be glad to know that it is now possible to Jailbreak the higher bands of 6.1.x, which includes 6.1.3, 6.1.4 and 6.1.5, untethered utilizing a brand new Jailbreaking tool called P0sixpwn.
How To Jailbreak iOS 6.1.3, 6.1.4 And 6.1.5 Untethered With P0sixpwn
The P0sixpwn jailbreak tool is compatible with both Mac OS X and Windows and will Jailbreak all iOS Devices that can run the 6.1.3, 6.1.4 or 6.1.5 firmware. And if P0sixpwn sounds familiar it is because it was originally released as a Cydia package for pre-Jailbroken A4 devices.
Before we get right into the tutorial on Jailbreaking your device with P0sixpwn it is important to note the following:
  • The Jailbreak supports ALL iOS Devices capable or running 6.1.3, 6.1.4 and 6.1.5.
  • Apple isn’t signing iOS 6.1.x on A5 devices and above (like the iPhone 5) so if something goes wrong during the jailbreak or afterwards forcing you to restore, there is no way to reinstall iOS 6.1.x. You will be forced to upgrade to the latest iOS 7 version without the possibility of downgrading from iOS 7 to 6.1.x either.
  • Ensure that you backup your device through iTunes or iCloud before going ahead with the jailbreak.
  • Disable any kind of passcode protection on the device you are Jailbreaking.

How To Jailbreak 6.1.3, 6.1.4 And 6.1.5 Untethered

Step 1) - The first thing you will need to do is download P0sixpwn for Mac OS X or Windows. You can do so by visiting the official P0sixpwn website HERE
Step 2) - Extract P0sixpwn if it hasn’t been done automatically and launch the application..
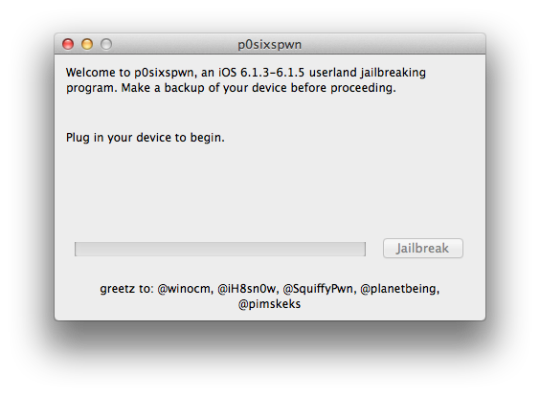
P0sixpwn How To Jailbreak Mac OS X
If Mac OS X prevents you from opening P0sixpwn by returning you with “P0sixspwn can’t be opened because it is from an unidentified developer,” right click on the app icon and then click the Open option. Finally click on Open again when you get the “p0sixspwn is an application downloaded from the Internet. Are you sure you want to open it?” prompt.
On Windows ensure you run P0sixpwn as an administrator.
Step 3) - Plug your iPhone, iPod Touch or iPad into your computer, back it up through iTunes and then disable any active passcode if you haven’t already.
Step 4) - Finally click the Jailbreak button and watch the magic happen. Your device will reboot a few times and then it will be automatically Jailbroken on your version of 6.1.x.

How to Jailbreak Your iPhone 4 Using RedSn0w (Windows) [6.1.3]

How to Jailbreak Your iPhone 4 Using RedSn0w (Windows) [6.1.3]


These are instructions on how to perform a tethered jailbreak of your iPhone 4 on iOS 6.1.3 using RedSn0w for Windows.

A tethered jailbreak means you will need to connect your device to the computer each time you reboot. If you are on iOS 6.0 through iOS 6.1.2, please do not update.

Step One
Create a folder on your desktop called Pwnage

Download the latest version of RedSn0w from here and place it in the Pwnage folder. Likewise, download the 6.0 and 6.1.3 firmware from here and place it in the Pwnage folder. 

Extract the RedSn0w zip file to the Pwnage folder.

Step Two: 
If you haven't already updated to iOS 6.1.3 then launch iTunes and perform a backup of your device.

Select your iPhone from the list of devices on the left then hold down Shift and click the Restore button. 

Navigate to the Pwnage folder on your desktop and select the 6.1.3 firmware ipsw. Click the Choose button to continue.

iTunes will now update your iPhone to the new firmware.

Step Three
Right click or control-click the redsn0w application from the redsn0w folder we extracted earlier and chooseRun as administrator from the popup menu that appears.


Step Four
Once RedSn0w opens click the Extras button.

Step Five
From the Extras menu click the Select IPSW button.

Step Six
Navigate to the Pwnage folder on your desktop and select the iOS 6.0 IPSW then click Open.

Step Seven
You'll be informed that the iOS 6.0 IPSW will be used for the rest of the session. Click OK.

Step Eight
Click the Back button and then click the Jailbreak button from the main menu.

Step Nine
RedSn0w will now prepare the jailbreak data.

Step Ten
Ensure Install Cydia is selected from the options menu then click Next.

Step Eleven
Turn OFF your device then click the Next button

Step Twelve
RedSn0w will now guide you through the steps to get into DFU mode.

Hold down both the Home button and the Power button for 10 seconds.

Release the Power button and continue holding the Home button until RedSn0w detects the device.

Step Thirteen
Your iPhone will now be exploited with limera1n.

Step Fourteen
RedSn0w will now reboot your device.

Step Fifteen
RedSn0w will upload a new RAM Disk and Kernel.

Step Eleven
Once this is complete you will be notified that RedSn0w is done and that this is a tethered jailbreak. 


BOOT TETHERED
Once you have jailbroken you will need to rerun redsn0w to boot tethered.

Step One
From the main RedSn0w menu click the Extras button.

Step Two
Choose Select IPSW from the Extras menu and select the iOS 6.0 IPSW. Next, choose Just boot from the menu and follow the instructions to put your device into DFU mode again for boot.

*A big thanks is owed to the iPhone Dev-Team and Geohot for their hard work and contribution to the iPhone community.

How to Change the Location of Your iTunes iPhone Backups (Windows)

How to Change the Location of Your iTunes iPhone Backups (Windows)


These are instructions on how to change the location that iTunes uses to backup your iPhone, iPad, or iPod touch for Windows.

Step One
Press Windows+R on your keyboard to bring up to the Run dialog. Input cmd into the Open field and click OKto launch Command Prompt.

Step Two
Navigate to the MobileSync directory by inputting the following command and pressing Enter.

cd "%APPDATA%\Apple Computer\MobileSync"

Step Three
Rename your old backup folder using the following command.

ren Backup Backup_Old

Step Four
If you haven't created a new directory to store your backups please do so now.

Step Five
Input the following command to create a symbolic link to your new directory.

mklink /J "%APPDATA%\Apple Computer\MobileSync\Backup D:\temp\Backup"


Step Six
You can use Windows Explorer to verify the symbolic link was created. Notice the arrow at the bottom left of the icon.

Step Seven
Test out the change by performing a backup with iTunes and verifying that your files are backed up to the new directory.

How to Jailbreak Your iPhone 5, 4S, 4, 3GS Using Evasi0n (Windows) [6.1]

How to Jailbreak Your iPhone 5, 4S, 4, 3GS Using Evasi0n (Mac) [6.1]


These are instructions on how to jailbreak your iPhone 5, iPhone 4S, iPhone 4, or iPhone 3GS on iOS 6.0 to iOS 6.1 using Evasi0n for Windows.


Step One
Ensure your iPhone is on iOS 6.0 to iOS 6.1

Step Two
Create a folder called Pwnage on your desktop and download the Evasi0n utility into the folder. You can find download links for Evasi0n here.

Step Three
Extract the Evasi0n zip file to the Pwnage folder on your desktop.

Step Four
Double click the newly created evasi0n-win folder to open it.

Step Five
Right click the Evasi0n exe icon then select Run as Administrator from the contextual menu to launch the application. 

Step Six
Ensure your iPhone is connected to the computer via a USB cable if you haven't already.

Step Seven
Remove any lock screen passcodes on your device then click the Jailbreak button to begin.

Step Eight
The app will retrieve information from the device to generate jailbreak data, inject stage 1 jailbreak data, reboot the device, wait for the device to be ready, inject stage 2 jailbreak data, upload Cydia, and upload the Cydia packages list.


Step Nine
You will then be asked to unlock your device and tap the new 'Jailbreak' app icon. It is imperative that you only tap the icon once. The app will open and immediately close.


Step Ten
Evasi0n will then inject the remount payload, remount the root filesystem, prepare the final jailbreak data, inject the final jailbreak data, and complete!


Step Eleven
Your iPhone will now reboot with Cydia on the SpringBoard!


THANKS:
Of course, much thanks is due to the Evad3rs for their hard work in making this jailbreak possible.

How to Downgrade Your iPhone 3GS From iOS 6.x to iOS 5.x (Windows)

How to Downgrade Your iPhone 3GS From iOS 6.x to iOS 5.x (Windows)


These are instructions on how to downgrade your iPhone 3GS from iOS 6.x to iOS 5.x using saved SHSH blobs and Redsn0w for Windows.

Step One
Create a folder on your desktop called Pwnage

Download the latest version of RedSn0w from here and place it in the Pwnage folder. Likewise, download the firmware you would like to restore to and the firmware you are current on from here and place it/them in the Pwnage folder. 

Extract the RedSn0w zip file to the Pwnage folder.

Step Two
Right click or control-click the redsn0w application from the redsn0w folder we extracted earlier and choose Run as administrator from the popup menu that appears.


Step Three
Click Extras from the main menu.

Step Four
Click Even More from the Extras menu.

Step Five
Click Restore from the Even More menu.

Step Six
Click IPSW from the Restore menu, choose the IPSW you would like to restore to from the window that appears, and click Open.


Step Seven
Redsn0w will ask you if you would like to prevent the baseband from being updated. Click Yes.

Step Eight
Redsn0w will inform you that Pwned DFU mode is needed to restore. Click the OK button.

Step Nine
Connect your device, turn it off, and then click the Next button

Step Ten
RedSn0w will now guide you through the steps to get into DFU mode.

Hold down both the Home button and the Power button for 10 seconds.

Release the Power button and continue holding the Home button until RedSn0w detects the device.

Step Eleven
Your iPhone will now be exploited with limera1n.

Step Twelve
RedSn0w will check Cydia to see if you have the correct blobs saved.

If RedSn0w is unable to find your blobs automatically you can try to click the Remote button to try again or you can click the Local button to search for blobs on your computer.

Step Thirteen
RedSn0w will now prepare a system restore image.

Step Fourteen
Your device will then be restored to the new firmware.

Step Fifteen
You'll be informed when your restore has completed successfully. 

 
 iPhone © 2012 | Designed by LogosDatabase.com, in collaboration with Credit Card Machines, Corporate Headquarters and Motivational Quotes