


These are instructions on how to jailbreak your iPad Air, iPad 4, iPad 3, iPad 2, or iPad mini on iOS 7.0 to iOS 7.0.4 (7.1 beta 1 and beta 2 work as well) using Evasi0n for Mac.
Before we begin, please make sure you have no passcode lock on your device (you can add it back after the jailbreak is applied). If you previously updated OTA, you must do a full backup then re-restore.
Step One
Connect your iPad to your computer then perform a manual backup of your iPad using these instructions.
Step Two
Create a folder called Pwnage on your desktop and then download the latest version of evasi0n into the folder. Here are the Evasi0n Download Links.
Additionally, we recommend you download the latest iOS 7.0.4 firmware for your device into the Pwnage folder. The evad3rs suggest a full restore before performing the jailbreak. Here are the iPad Firmware Download Links

Step Three
Double click the Evasi0n dmg file from the Pwnage folder on your desktop to mount it.

Step Four
Drag the Evasi0n application from the mounted dmg into the Pwnage folder on your desktop.

Step Five
Launch iTunes from your dock.
Step Six
Ensure your iPad is connected to the computer via USB and select it from the left sidebar or the top right corner of the window.
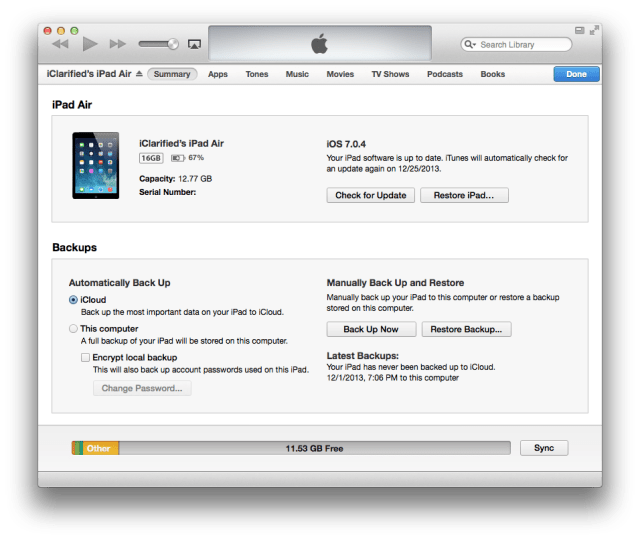
Step Seven
Press and hold the Option key and click the Restore iPad... button.

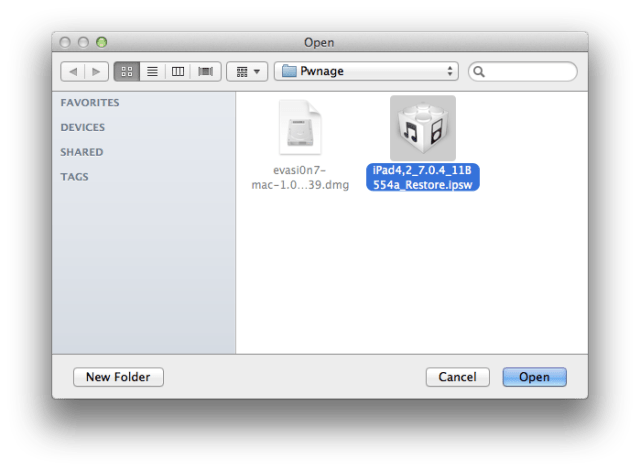
Step Eight
From the popup window that appears, select your iPad firmware ipsw from the Pwnage folder we created on the desktop and click Open.
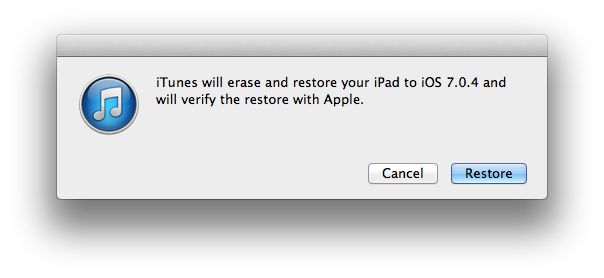
Step Nine
You will be asked to confirm your restore. Please click the Restore button.
Step Ten
Once your restore has successfully completed, right click (or control+click) the evasi0n app icon from the Pwnage folder then select Open from the contextual menu to launch the application. If prompted to confirm, click the Open button again.


Step Eleven
Ensure there are no lock screen passcodes on your device then click the Jailbreak button to begin.

Step Twelve
The app will retrieve information from the device to generate jailbreak data, upload jailbreak data, inject evasi0n app 1, inject evasi0n app 2, configuring system 1, configuring system 2, and then reboot.


Step Thirteen
You will then be asked to unlock your device and tap the new 'evasi0n 7' app icon. It is imperative that you only tap the icon once. The app will open and immediately close.


Step Fourteen
Evasi0n will then reboot the device again, modify rootfs, and then complete!


Step Fifteen
Your iPad will now reboot with Cydia on the SpringBoard! Don't forget to download the iClarified app from here!

ANSWERS:
If you need help with this tutorial please post a question in the comments or submit a question to the iClarified community using our Answers section.
Before we begin, please make sure you have no passcode lock on your device (you can add it back after the jailbreak is applied). If you previously updated OTA, you must do a full backup then re-restore.
Step One
Connect your iPad to your computer then perform a manual backup of your iPad using these instructions.
Step Two
Create a folder called Pwnage on your desktop and then download the latest version of evasi0n into the folder. Here are the Evasi0n Download Links.
Additionally, we recommend you download the latest iOS 7.0.4 firmware for your device into the Pwnage folder. The evad3rs suggest a full restore before performing the jailbreak. Here are the iPad Firmware Download Links

Step Three
Double click the Evasi0n dmg file from the Pwnage folder on your desktop to mount it.

Step Four
Drag the Evasi0n application from the mounted dmg into the Pwnage folder on your desktop.

Step Five
Launch iTunes from your dock.
Step Six
Ensure your iPad is connected to the computer via USB and select it from the left sidebar or the top right corner of the window.

Step Seven
Press and hold the Option key and click the Restore iPad... button.
Step Eight
From the popup window that appears, select your iPad firmware ipsw from the Pwnage folder we created on the desktop and click Open.

Step Nine
You will be asked to confirm your restore. Please click the Restore button.

Step Ten
Once your restore has successfully completed, right click (or control+click) the evasi0n app icon from the Pwnage folder then select Open from the contextual menu to launch the application. If prompted to confirm, click the Open button again.


Step Eleven
Ensure there are no lock screen passcodes on your device then click the Jailbreak button to begin.

Step Twelve
The app will retrieve information from the device to generate jailbreak data, upload jailbreak data, inject evasi0n app 1, inject evasi0n app 2, configuring system 1, configuring system 2, and then reboot.


Step Thirteen
You will then be asked to unlock your device and tap the new 'evasi0n 7' app icon. It is imperative that you only tap the icon once. The app will open and immediately close.


Step Fourteen
Evasi0n will then reboot the device again, modify rootfs, and then complete!


Step Fifteen
Your iPad will now reboot with Cydia on the SpringBoard! Don't forget to download the iClarified app from here!

ANSWERS:
If you need help with this tutorial please post a question in the comments or submit a question to the iClarified community using our Answers section.

0 comments:
Post a Comment