How To Enable Voice Control On iPhone 2G/3G

Voice control will be a very useful feature for all of us, so i found a way to setting up the voice control in your iPhone 2G or 3G just slightly like iPhone3GS. (only for OS 3.0 and OS 3.1)

Click the image to open in full size.

Two applications you need to download:-

2. Appflow ( from Cydia )

Without any other app by following here.

Here are two files which when added will give you a toggle for Voice Control in Settings-General-Home

/Applications/Preferences.app/Home Button.plist
/Applications/Preferences.app/English.lproj/Home Button.strings

Home Button.plist - Megaupload , Rapidshare , 2Shared
Homt Button.strings -
Megaupload , Rapidshare , 2Shared

Instructions:-
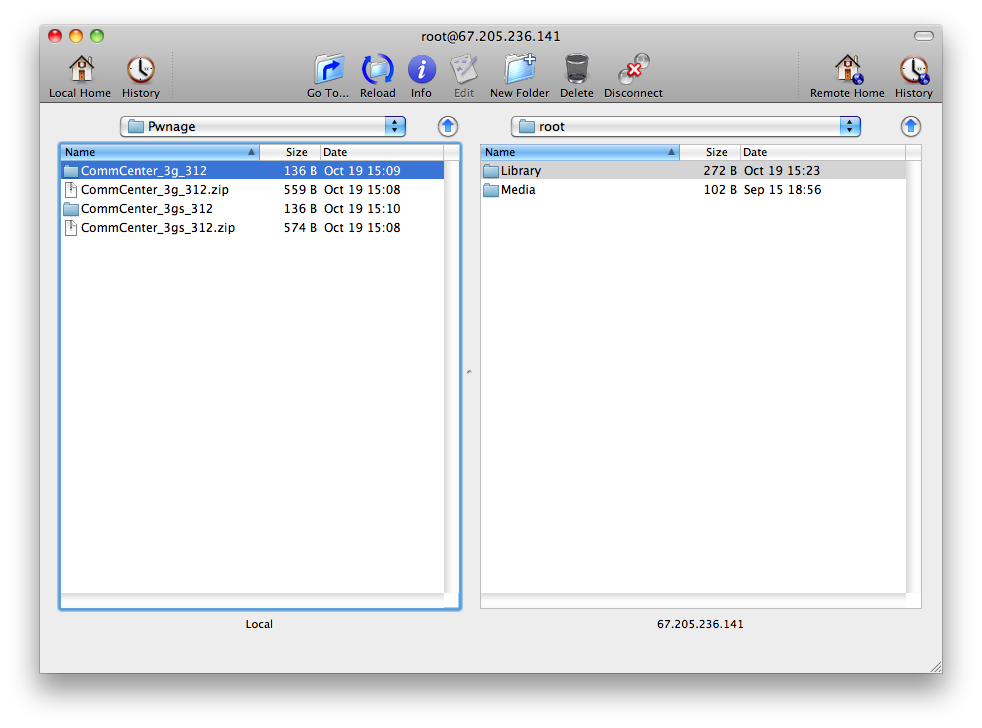
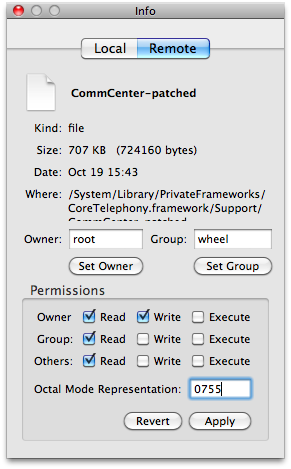
1. You need to SSH the voice control.app into your \stash\Application
2. Set permission voice control.app to 0755
3. Respring
4. Go to cydia and search for appflow
5. Install Appflow
6. Open Appflow, scroll down until you get Voice Control and Assign To Double tap
7. Try your Voice Control by double tap your home button / double tap on the app icon.

Example: If your contact list have Annie, You can try say "Annie" then you'll see the screen switch to Annie contact and you may say "Home" to call home, "Mobile to call mobile and so on~...

Voice commands:-
Switch to Contact
Switch to iPod
Switch to Bookmarks
Go Back
Try Again

How to Enable Tethering on Your 3.1.2 iPhone 3G, 3GS

These are instructions on how to patch the CommCenter of your 3.1.2 iPhone 3G, 3GS to enable Internet tethering.

Warning: These are advanced instructions and are not suggested for beginners.

Prerequisites: You must be jailbroken on the iPhone 3.1.2 firmware. You need to have SSH installed and you need to know the IP Address of your device on the local network. Finally you will also need Fugu installed.

Step One
Create a folder on your desktop called Pwnage. In it place the patch file for your appropriate device. [3G] [3GS]

Step Two
Double the download zip file to extract its contents. You will get a folder called CommCenter_3g_312 or CommCenter _3gs_312.

Step Three
Launch Fugu from your applications folder.

Step Four
Input your iPhone's IP Address in the Connect To: field and use root as the Username. Click the Connect button to continue. For this to work you must have SSH installed.

When prompted input alpine as the password then click the Authenticate button.

Step Five
Once Fugu opens the directory contents of your device, use the left panel to navigate to the Pwnage folder on your desktop.

Next, click the Go To.. button on the toolbar.

Input /System/Library/PrivateFrameworks/CoreTelephony.framework/Support/ into the Go To field, selectRemotely, then click the Go button.

Drag the CommCenter file from the right panel into the left panel to copy it to your computer.

Step Six
Launch Terminal by double clicking it from the Applications:Utilities folder on your computer.

Execute cd Desktop/Pwnage to navigate to your Pwnage folder.

Execute bspatch CommCenter CommCenter-patched CommCenter_3g_312/CommCenter3g.patch to make a patched version of the CommCenter.

IMPORTANT: Remember to change 3g to 3gs if you have the iPhone 3GS. ie. bspatch CommCenter CommCenter-patched CommCenter_3gs_312/CommCenter.patch

Now we need to confirm that the patched file was created successfully. Input this command into the Terminal window to check: /usr/bin/openssl sha1 CommCenter-patched.

Check your SHA1 with the correct ones below to make sure the patch occurred successfully. If it did not. Do not continue.
1b19712035f33654cf72838ebe1a2033931b56b2 # 3GS
063165c3fa3e21d30eb4b486fab924ba3ef0ea5e # 3G

Step Seven
Return to Fugu and Control-Click CommCenter in the right panel. Select Rename from the contextual menu and rename the file to CommCenter-backup.


Click the Reload button on the toolbar if necessary then drag the CommCenter-patched file from the left panel to the right.

Control-Click the CommCenter-patched file from the right panel and select Get Info from the contextual menu. At the bottom of the Info window change the permissions to 0755 and click the Apply button.


Control-Click the CommCenter-patched file in the right panel and select Rename from the contextual menu. Rename the file to CommCenter.


Step Eight
You may now reboot your iPhone and you will be able to use Internet Tethering. You may need to follow this tutorial to apply the correct settings for your carrier.

How to Jailbreak Your iPhone, iPod Using BlackRa1n [Mac]

These are instructions on how to jailbreak your iPhone and iPod touch using BlackRa1n for Mac.

The BlackRa1n jailbreak will work with the latest 3.1.2 firmware; however, it will not hacktivate your iPhone. This means that if you are not on an official Apple approved carrier BlackRa1n cannot activate it.

For those with the new iPod touch, BlackRa1n only supports a tethered jailbreak. This means that once jailbroken you should not let your battery die. If it does die you will need to reconnect it to the computer and use BlackRa1n to boot it.

WARNING: Even though the GeoHot jailbreak supports 3.1.2 do not update if you are on iPhone OS 3.0.1 or 3.0. You will lose your unlock. Use PwnageTool to safely update to 3.1 without performing a baseband update. If you really must have 3.1.2 then wait for the next version of PwnageTool. If you have already updated to 3.1 or 3.1.2 without using PwnageTool then you've lost the ability to unlock for the time being. You can now use BlackRa1n to at least regain your jailbreak :)

Ok lets begin...


Step One
Open your web browser of choice and navigate to http://www.blackra1n.com. Click the Apple logo at the bottom of the screen.

Step Two
When prompted save the download to your desktop

Step Three
Then double click the downloaded blackra1n zip file to extract the application, then double click the application icon to launch the program

Step Four
Make sure your iPhone or iPod is connected to the computer then click the large make it ra1n button

Step Five
You iPhone will now be placed in recovery mode.

You will see a picture of GeoHot that replaces the regular recovery mode screen on your device.

blackra1n will run and then your device will reboot.

A popup message will appear informing you that BlackRa1n is free software and if you appreciate it you can donate to GeoHot at geohot@gmail.com.

Step Six
Once your device reboots it will be jailbroken and you will notice a blackra1n icon on the desktop. Make sure you have an internet connection and press to launch the application.

Choose the installer application of your choice then press the Install button at the top right of the screen

BlackRa1n will begin to download and install the package you selected.

Step Seven
Once complete BlackRa1n will respring your iPhone and you will find the installer package of your choice on the Springboard.

Step Eight
Once you have confirmed your installer package is working correctly you may use the Uninstall blackra1nbutton inside the BlackRa1n app to remove it from your springboard.


***THANKS: A big thanks to Geohot for making this jailbreak possible. Also thanks to those who contributed to making it a success.

How to Jailbreak Your iPhone 3GS Using PwnageTool [Mac]

This tutorial will show you how to jailbreak your iPhone 3GS using PwnageTool for Mac.


Step One
Make a folder called "Pwnage" on the desktop. In it, you will need a couple of things. PwnageTool 3.1.4, found here or here

You will also need the 3.1.2 iPhone firmware.

When downloading the IPSW file, it is best to download it with Firefox since Safari often auto extracts it!

Step Two
Double click to mount PwnageTool 3.1.4 then drag the PwnageTool icon into the Pwnage folder.

Then from the Pwnage folder double click to launch the PwnageTool application.

Click Ok if presented with a warning.

Step Three
Click to select Expert Mode from the top menu bar

Step Four
Click to select your iPhone. A check-mark will appear over the image of the phone.

Step Five
Click the blue arrow button to continue. You will be brought to the "Browse for IPSW" page. On my laptop, it automatically found the IPSW. If PwnageTool doesn't automatically find the ipsw file you can click Browse for IPSW....

Click to select the found IPSW file, a checkmark will appear next to it. Then click the blue arrow button to continue.

Step Six
You will then be brought to a menu with 7 choices. Click to select General then click the blue arrow button.

The General settings allows you to decide the partition size. Check Activate the phone if you are not with an official carrier then click the blue arrow button.

NOTE*: Deselect Activate if you have an iPhone legitimately activated on an official carrier.
NOTE*: You may need to increase the size of the root partition slightly. My first attempt failed at creating the IPSW until I increased the size to about 695 MB.


The Bootneuter settings are greyed out for the 3G iPhone. Click the blue arrow button.

The Cydia settings menu allows you to create custom packages so you do not have to manually install the necessary them later.

Click to select the Download packages tab. Then click the Refresh button to display all the available packages. Double clicking the package you want will download it and make it available in the Select Packages tab.

Checkmark the ones you want then Click the blue arrow button.

The Custom Packages Settings menu displays listed package settings for your custom IPSW. For know leave these settings as is. Click the blue arrow button to continue.

The Custom Logos Settings menu allows you to add your own images as boot logos. Click the Browse button to select your Boot logo and Recovery logo. If you would like to use the iClarified ones they can be found here:Boot Logo, Recovery Logo

Remember the rules for them: RGB or Grayscale format with Alpha channel and dimensions below 320x480...

Click the blue arrow button to continue.

Step Seven
You are now ready to begin the pwnage process! Click the Build button to select it then click the Blue arrow button to begin.

Step Eight
You will be asked to save your custom .ipsw file. Save it to your Pwnage folder you created on your Desktop.

Your IPSW is now being built. Please allow up to 10 minutes.

You will be asked to enter your administrator password. Do this then click the OK button.

You will be asked if your iPhone has been pwned before. If unsure click the NO button.

Step Nine
If your iPhone isn't already connected to the computer connect it now.

After delivering the payload PwnageTool will have placed your iPhone in recovery mode. Click OK to close the popup message telling you this.


iTunes will also pop-up saying it has detected an iPhone in recovery mode.


Step Ten
In iTunes, hold the Alt/Option key and click Restore.

Step Eleven
Navigate to the Pwnage folder on your desktop using the dialog window that appears. Select the custom IPSW that was created (iPhone2,1_3.1.2_7D11_Custom_Restore.ipsw) and click the Open button.

Step Twelve
iTunes will now restore the firmware on your iPhone. This can also take up to 10 minutes. Once done you will be rebooted into jailbroken iPhone OS 3.1.2!


***THANKS: Thank you to the Dev-Team for their hard work in making this jailbreak and tutorial possible!

 
 iPhone © 2012 | Designed by LogosDatabase.com, in collaboration with Credit Card Machines, Corporate Headquarters and Motivational Quotes